When you start your bracelet, do not make a buckle. Just tie it as normal and then make braids or squareknots at both ends. The patternpart of the bracelet should be about 3/4 of your wrist, leaving 1/4 to make the adjustable knot.....
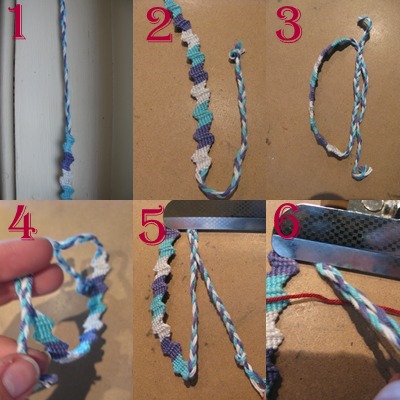
1. This is how it should look like at both ends . Do not worry about if it will fit you just yet. I usually make the braided ends about the same length as the bracelet itself.
2. Fold one end towards the other.
3. Fold the other end towards the first.
4. You know have a circle.
5. Secure this either by using pins, tape or a clipboard like I've done.
6. Add another string and lay it underneath both braided parts. I've used a red one to make what I'm doing more visible, but you should ofcourse use a color that suits your bracelet. From this point on, think of the 2 braided parts as a holding cord. While the newly added string(the red one) is your working cord.
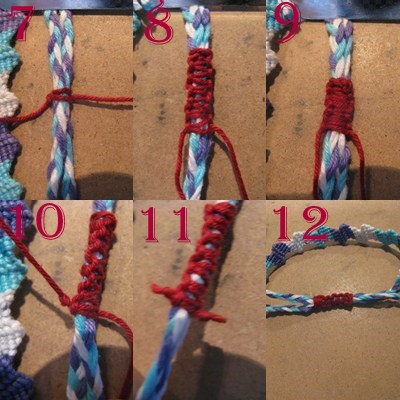
7. Use the red string to make a square knot.
8. Make several square knots. Remember to not make them to tight, as the braided parts need to be able to slip through easily.
9. You can either leave the squareknots loose like showed in picture8, or you can push them together like this.
10. Make an overhand knot on each end as close to the square knots as possible.
11. Cut off the strings as close to the overhand knot as possible. Use clear nailpolish to avoid the strings from fraying or use superglue to fasten them to the squareknots, so you don't have the 2 "dots" sticking out.
12. This is how it looks like now.

13. As you can see you can move the squareknots around by pulling the braided parts.
14. Now, put it onto where your hand is widest and thighten it. Take it off your hand carefully so you don't accidently thighten it some more or letting it get looser.
15. Make an overhand knot on each of the braided ends as close to the squareknots as possible.
16. Cut off the leftover string and secure the ends from fraying by using nailpolish or whatever you prefer.
Tip: I tend to make them a little bit thighter then my hand, since most my bracelets tend to get looser after a while.
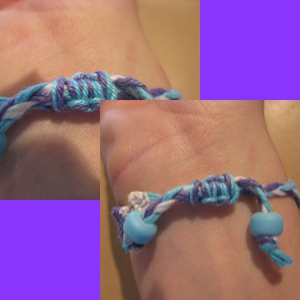
This is the finished product. I took off the red string and used the leftover purple and blue string I had from tying(If you are like me and always cut the strings to long, you should have alot of extra string lying around, which you can use for this). I also added a couple of beads.
Buckle with 2 loops
This is an easy method for fastening you bracelet without having loose strings hanging from your wrist.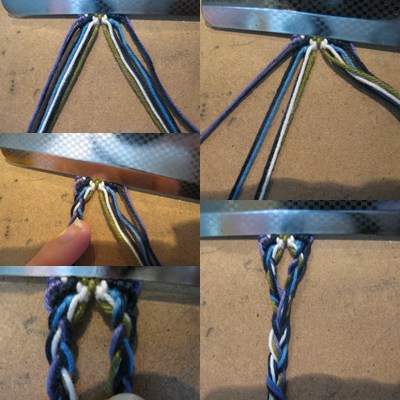
This is maybe my favorite way of fastening the bracelet. What you do is you seperate your strings into 2 groups. You then start braiding each group seperatly, before you braid them together, leaving a hole in the middle. The hole showed in this picture is very big, since I've braided each string to much, but it was just to show how it's done. You do this on each side. The braided part from the hole to the overhand knot at the end should be about 4-5cm, depending on how big the pattern on your bracelet is compared to your wrist.
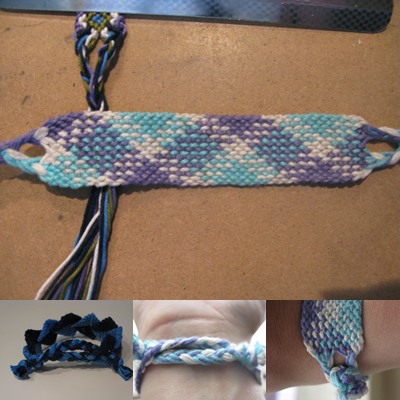
This one shows how it should look like with the holes at both ends of the bracelet. The 3 other pictures shows how it should look like when it's done. What you do to fasten it is just pull each end into the hole on the opposite side. This will make a "lock". Just make sure that the knots at the end is not to big to fit into the hole, or so small that they slip out.
No comments:
Post a Comment